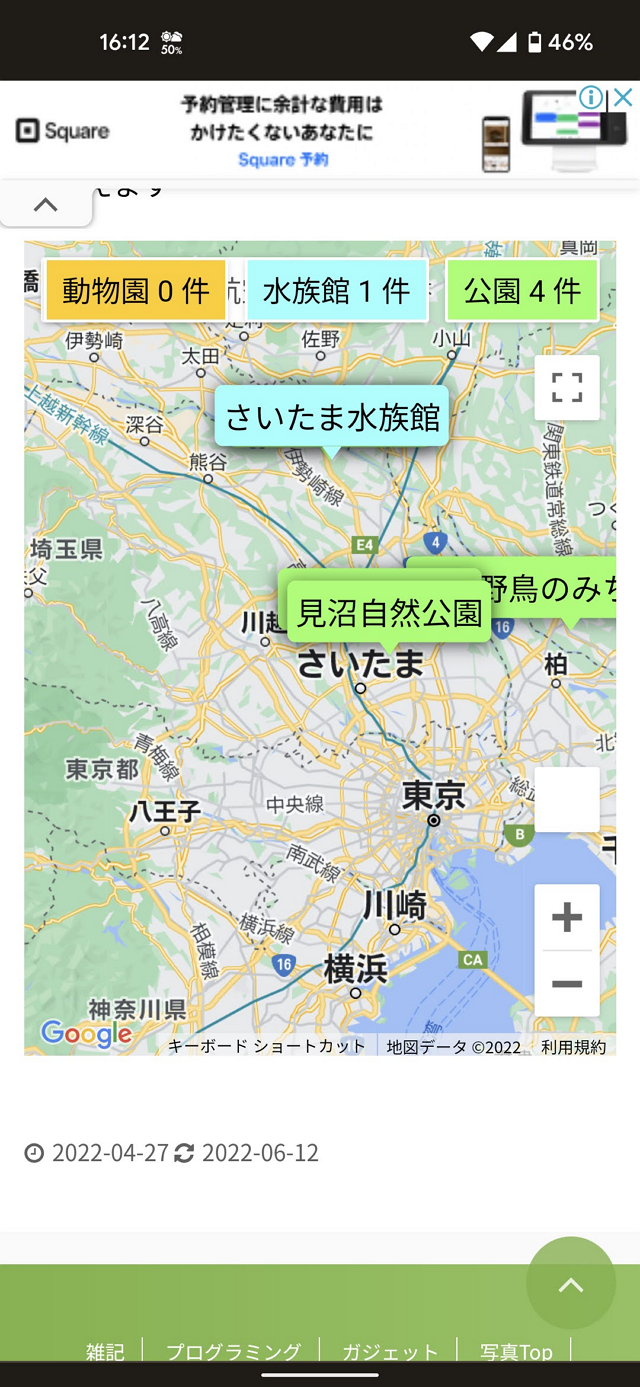
前回はMarkerというパーツを使って地図上にリンクを乗っけてたんですが。
このMarker、テキストを表示しようとしたらツールチップになってしまい、うまく表示ができなかったんですよね。。。
-

-
Google Map APIで地図にMarkerを描画する
趣味で撮る写真をどうにか整理したくて。 ただリンク張るだけだと面白くないので、Google Map APIで地図の上にMarkerとリンクを描画してみました。 ついでにWordPressの上でJSファ ...
続きを見る
そこでAPIのサンプルを眺めていたら、OverlayViewというクラスをカスタムして自作のポップアップを描画できると。
見た目もCSSで飾れて便利そうなので置き換えてみました。
目次
参考サンプル
今回やりたいのに近いのはこれ。
対象の位置情報に吹き出しを立てる感じ。
ただこのサンプルはType Script版しかなかったので、こっちも参考にしました。
指定した範囲に画像を表示して、ボタンで表示/非表示を変えられるようになってます。
変更点
最終的にやってることは同じなんですがパーツが変わってます。
他にもいろいろいじってあるので、ソース自体は前回とだいぶ変わってます。
大きく変わったのはこの辺り。
Marker → OverlayViewに変更
USGSOverlay classの拡張
そのまま使えばよかったMarkerと違って独自のポップアップを表示するにはUSGSOverlayをいろいろ改造しないといけません。
google.maps.OverlayViewを継承したclassを作って必要な処理を追加していきます。
classの拡張は画像を表示してるサンプルをベースにしました。
USGSOverlay classの読み込み
USGSOverlay classはAPIが持つクラスを拡張しているので、classを読み込む時点でAPIが使えるようになっている必要があります。
initMap()が発火したら使用可能になったということなので読み込み処理はここに書きます。
フロントJSだとimportが使えないらしいので、USGSOverlayをglobalで宣言しておいて
|
1 2 3 4 5 6 7 8 9 10 |
let USGSOverlay; /** * Google APIが読み込まれたら自動で実行される * マップの初期化を行う */ function initMap() { // google.maps.OverlayViewを拡張したclassの読み込み USGSOverlay = readUSGSOverlayClass(); |
readUSGSOverlayClass()でclassを変数に入れて…
|
1 2 3 4 5 |
/** * USGSOverlayのimport処理 */ function readUSGSOverlayClass() { USGSOverlay = class USGSOverlay extends google.maps.OverlayView { |
あとは使う時にnewすればOK。
|
1 2 3 4 5 6 |
const overlay = new USGSOverlay( key, new google.maps.LatLng(spot["latlng"]), spot["name_jp"], spot["url"] ); |
JSのお作法としてこれでいいのかよくわからないですが動くことは動きますw
サンプルの解説によると
単純にオーバーレイを作成 / 削除するのではなく、表示 / 非表示を切り替えたい場合は、独自の
hide()メソッドとshow()メソッドを実装してオーバーレイの表示状態を変更できます。代わりに、地図の DOM からオーバーレイを取り除くこともできますが、この操作の費用は若干高くなります。なお、地図の DOM に再度オーバーレイを貼り付ける際は、オーバーレイのonAdd()メソッドをもう一度呼び出す必要があります。
下手な実装をすると想定外の請求をされる可能性があると。。。
正確な課金タイミングはよくわからないですが、とりあえずaddやらsetやらやると課金されるってことかも。
ということで、サンプルに倣ってhide()、show()で表示を切り替えるようにしました。
具体的にはnewして作ったoverlayを配列に入れて取っておいて
|
1 2 3 4 5 6 7 8 9 10 |
const overlay = new USGSOverlay( key, new google.maps.LatLng(spot["latlng"]), spot["name_jp"], spot["url"] ); overlay.setMap(map); overlays.push(overlay); } popups[key] = overlays; |
表示切替用のボタンをクリックしたときにtoggle()を呼び出します。
|
1 2 3 4 5 6 |
toggleButton.addEventListener("click", () => { toggleButton.classList.toggle("off"); popups.forEach((popup) => { popup.toggle(); }); }); |
HTML上に書いていたラジオボタンを地図上に表示するようにした
サンプルを見ていたら、地図自体にボタンを追加している模様。
HTML側にラジオボタン描くのもちょっと。。。
なので真似します。
map.controlsに要素を追加すれば地図上に表示されます。
どこに追加するかはここを参考に。
|
1 2 |
// 地図の右上に追加する map.controls[google.maps.ControlPosition.TOP_RIGHT].push(toggleButton); |
ただ、このボタンのレイアウトがちょっと難しくて。。。
Googleデフォルトのボタンみたいに隙間なく並べたかったんですが、
- margin-rightがないと右側の隙間が作れない
- divに入れるとボタンが全部左に寄ってしまう
ということで一旦諦めました。
CSS得意な人なら直せるんでしょうけど。。。
さらにスマホの縦画面で見るとこう。
幅が足りないせいでデフォルトの地図や航空写真のボタンと重なってしまいました。
これはもう場所の問題ではないので、文字じゃなくアイコンにするなど省スペース化しないとダメそうですね。
ここら辺はまぁ、いつか直すということで。。。
ちなみにこの画像だとペグマンが表示されず空欄になってますが、WordPress側のCSSが干渉してたので修正しました。
-

-
ペグマンが行方不明になるので修正
Google Map APIを使って地図を作っていたんですが。 ペグマン表示されてないじゃん!! 幸い同じ現象について書いてる人がいたので無事解決。 ペグマン帰ってきました。 目次1 ペグマンとは2 ...
続きを見る
ソース全体
WordPressに載せるためHTMLにJSの読み込みなんかを書いてません。
足りないところはいい感じに足してください。
Googleのサンプルをコピってるので一部英語が残ってます。。。
地図表示.html
|
1 2 3 4 5 6 |
<!--map Objectを描画する箱 --> <div id="map"></div> <!-- Goole Map APIを呼び出すためのリクエスト --> <script src="https://maps.googleapis.com/maps/api/js?key=【自分のAPI Key】&callback=initMap&libraries=&v=weekly" async></script> |
スタイル.css
CSS書くのが苦手過ぎる。
|
1 2 3 4 5 6 7 8 9 10 11 12 13 14 15 16 17 18 19 20 21 22 23 24 25 26 27 28 29 30 31 32 33 34 35 36 37 38 39 40 41 42 43 44 45 46 47 48 49 50 51 52 53 54 55 56 57 58 59 60 61 62 63 64 65 66 67 68 69 70 71 72 73 74 75 76 77 78 79 80 81 82 83 84 85 86 87 88 89 90 91 92 93 94 95 96 97 98 99 100 101 102 103 104 105 106 107 108 109 110 111 112 113 114 115 116 117 118 119 120 |
/* Set the size of the div element that contains the map */ #map { height: 500px; /* The height is 400 pixels */ width: 100%; /* The width is the width of the web page */ } .labels { color: #ffffff; background: #000000; font-size: 14px; text-align: center; padding: 2px 10px; border-radius: 8px; } .popup-bubble { /* Position the bubble centred-above its parent. */ position: absolute; top: 0; left: 0; transform: translate(-50%, -100%); /* Style the bubble. */ background-color: white; padding: 5px; border-radius: 5px; font-size: 1.2rem; font-family: sans-serif; overflow-y: auto; max-height: 60px; box-shadow: 0px 2px 10px 1px rgba(0, 0, 0, 0.5); } .popup-bubble-anchor { /* Position the div a fixed distance above the tip. */ position: absolute; width: 100%; bottom: 8px; left: 0; } /* This element draws the tip. */ .popup-bubble-anchor::after { content: ""; position: absolute; top: 0; left: 0; /* Center the tip horizontally. */ transform: translate(-50%, 0); /* The tip is a https://css-tricks.com/snippets/css/css-triangle/ */ width: 0; height: 0; /* The tip is 8px high, and 12px wide. */ border-left: 6px solid transparent; border-right: 6px solid transparent; border-top: 8px solid white; } /* JavaScript will position this div at the bottom of the popup tip. */ .popup-container { cursor: pointer; height: 0; position: absolute; /* The max width of the info window. */ width: 100%; } .park.popup-bubble { background-color: #9f6; } .park.popup-bubble-anchor::after { border-top: 8px solid #9f6; } .aquarium.popup-bubble { background-color: #9ff; } .aquarium.popup-bubble-anchor::after { border-top: 8px solid #9ff; } .zoo.popup-bubble { background-color: #fc0; } .zoo.popup-bubble-anchor::after { border-top: 8px solid #fc0; } .custom-map-control-button { background-color: #fff; border: 2px solid; border-color: gray; border-radius: 2px; box-shadow: 0 1px 4px -1px rgba(0, 0, 0, 0.3); margin: 10px; margin-left: 0px; padding: 0 0.5em; font: 400 18px Roboto, Arial, sans-serif; overflow: hidden; height: 40px; cursor: pointer; } .custom-map-control-button:hover { background: #ebebeb; } .park.custom-map-control-button { background-color: #9f6; } .aquarium.custom-map-control-button { background-color: #9ff; } .zoo.custom-map-control-button { background-color: #fc0; } .off.custom-map-control-button { background-color: gray; } |
データ.js
無駄に多言語化を意識しているけど実装するかは未定。
|
1 2 3 4 5 6 7 8 9 10 11 12 13 14 15 16 17 18 19 20 21 22 23 24 25 26 27 28 29 30 31 32 33 34 35 36 37 38 39 40 41 42 43 44 45 46 47 48 49 50 51 52 53 54 55 56 57 58 59 60 61 62 63 64 65 66 67 68 69 70 71 72 |
const default_latlng = { lat: 35.9156984, lng: 139.5788846 }; const default_zoom = 9; const label_list = { jp: { label: { park: "公園", aquarium: "水族館", zoo: "動物園", }, counters: "件" }, en: { label: { park: "Park", aquarium: "Aquarium", zoo: "Zoo", }, counters: "spots" } } const spot_list = { park : [ { view : true, name_jp: "守谷野鳥のみち自然園", name_en: "Moriya Wild Bird Trails Nature Park", latlng: {lat: 35.9393907, lng: 140.0007313}, url: "https://nekodeki.com/photo-top/spot-list/moriya-wild-bird-trails-nature-park/" }, { view : true, name_jp: "七里総合公園", name_en: "Nanasato General Park", latlng: {lat: 35.9233411, lng: 139.6785493}, url: "https://nekodeki.com/photo-top/spot-list/nanasato-general-park/" }, { view : true, name_jp: "見沼自然公園", name_en: "Minuma Nature Park", latlng: {lat: 35.9063198, lng: 139.6951023}, url: "https://nekodeki.com/photo-top/spot-list/minuma-nature-park/" }, { view : true, name_jp: "羽生水郷公園", name_en: "Hanyu Suigo Park", latlng: {lat: 36.1715691, lng: 139.5950263}, url: "https://nekodeki.com/photo-top/spot-list/hanyu-suigo-park/" } ], aquarium : [ { view : true, name_jp: "さいたま水族館", name_en: "Saitama Aquarium", latlng: {lat: 36.1730556, lng: 139.5977778}, url: "https://nekodeki.com/photo-top/spot-list/saitama-aquarium/" } ], zoo : [ { view : false, name_jp: "上野動物園", name_en: "Ueno Zoo", latlng: {lat: 35.7164535, lng: 139.7713177}, url: "https://www.tokyo-zoo.net/zoo/ueno/" } ] }; |
描画処理.js
USGSOverlay classを別ファイルにしたかったけど諦めた…。
|
1 2 3 4 5 6 7 8 9 10 11 12 13 14 15 16 17 18 19 20 21 22 23 24 25 26 27 28 29 30 31 32 33 34 35 36 37 38 39 40 41 42 43 44 45 46 47 48 49 50 51 52 53 54 55 56 57 58 59 60 61 62 63 64 65 66 67 68 69 70 71 72 73 74 75 76 77 78 79 80 81 82 83 84 85 86 87 88 89 90 91 92 93 94 95 96 97 98 99 100 101 102 103 104 105 106 107 108 109 110 111 112 113 114 115 116 117 118 119 120 121 122 123 124 125 126 127 128 129 130 131 132 133 134 135 136 137 138 139 140 141 142 143 144 145 146 147 148 149 150 151 152 153 154 155 156 157 158 159 160 161 162 163 164 165 166 167 168 169 170 171 172 173 174 175 176 177 178 179 180 181 182 183 184 185 186 187 188 189 |
let USGSOverlay; let gMap; let toggleButtons = {}; /** * Google APIが読み込まれたら自動で実行される * マップの初期化を行う */ function initMap() { // google.maps.OverlayViewを拡張したclassの読み込み readUSGSOverlayClass(); // Mapオブジェクト作成 const firstViewPoint = default_latlng; gMap = new google.maps.Map(document.getElementById("map"), { zoom: default_zoom, center: firstViewPoint, }); // マップの読み込みが終わったら要素を追加 google.maps.event.addListenerOnce(gMap, "idle", function(){ addPopup(gMap); }); }; /** * マップに施設名のポップアップを追加する * @param {google.maps.Map} map - Google Map オブジェクト */ function addPopup(map) { // 施設情報読み込み Object.keys(spot_list).forEach(function(key) { // 新しいポップアップを追加する let popups = {}; let overlays = [] spot_list[key].forEach((spot) => { if (spot["view"]) { const overlay = new USGSOverlay( key, new google.maps.LatLng(spot["latlng"]), spot["name_jp"], spot["url"] ); overlay.setMap(map); overlays.push(overlay); } popups[key] = overlays; }); // 表示切替用のボタンを追加する addToggleButton( map, key, popups[key], label_list["jp"]["label"][key], label_list["jp"]["counters"] ); }); } /** * ポップアップの表示を操作するボタンを追加する * @param {google.maps.Map} map - Google Map オブジェクト * @param {Array} genre - ポップアップのジャンル * @param {Array} popups - 作成したポップアップ(USGSOverlay class)のリスト * @param {String} label - ボタンに表示する文字列 * @param {String} counters - ボタンに表示する文字列(助数詞) */ function addToggleButton(map, genre, popups, label, counters) { const toggleButton = document.createElement("button"); const cnt = popups.length; toggleButton.textContent = `${label} ${cnt} ${counters}`; toggleButton.classList.add(genre); toggleButton.classList.add("custom-map-control-button"); toggleButton.addEventListener("click", () => { toggleButton.classList.toggle("off"); popups.forEach((popup) => { popup.toggle(); }); }); // 地図の右上に追加する map.controls[google.maps.ControlPosition.TOP_RIGHT].push(toggleButton); } /** * USGSOverlayのimport処理 */ function readUSGSOverlayClass() { USGSOverlay = class USGSOverlay extends google.maps.OverlayView { div; genre; position; containerDiv; label; url; constructor(genre, position, label, url) { super(); this.genre = genre; this.position = position; this.label = label; this.url = url; } /** * onAdd is called when the map's panes are ready and the overlay has been * added to the map. */ onAdd() { // 吹き出し本体の作成 const bubbleBubble = document.createElement("div"); bubbleBubble.classList.add("popup-bubble"); bubbleBubble.classList.add(this.genre); bubbleBubble.textContent = this.label; // 吹き出し三角部分の作成 const bubbleAnchor = document.createElement("div"); bubbleAnchor.classList.add("popup-bubble-anchor"); bubbleAnchor.classList.add(this.genre); bubbleAnchor.appendChild(bubbleBubble); // 吹き出しを入れる箱 this.div = document.createElement("div"); this.div.classList.add("popup-container"); this.div.appendChild(bubbleAnchor); // クリックイベントを追加 this.div.addEventListener("click", () => { window.location.href = this.url; }); // 要素を描画するレイヤーに吹き出しを追加する // クリックイベントを使いたいのでoverlayMouseTargetを選択 const panes = this.getPanes(); panes.overlayMouseTarget.appendChild(this.div); } draw() { // 要素を描画する位置とサイズを指定する // 位置情報をfromLatLngToDivPixelで変換して設定する const overlayProjection = this.getProjection(); const pos = overlayProjection.fromLatLngToDivPixel(this.position); if (this.div) { this.div.style.left = pos.x + "px"; this.div.style.top = pos.y + "px"; } } /** * The onRemove() method will be called automatically from the API if * we ever set the overlay's map property to 'null'. */ onRemove() { if (this.div) { this.div.parentNode.removeChild(this.div); delete this.div; } } /** * Set the visibility to 'hidden' or 'visible'. */ hide() { if (this.div) { this.div.style.visibility = "hidden"; } } show() { if (this.div) { this.div.style.visibility = "visible"; } } toggle() { if (this.div) { if (this.div.style.visibility === "hidden") { this.show(); } else { this.hide(); } } } toggleDOM(map) { if (this.getMap()) { this.setMap(null); } else { this.setMap(map); } } } } |
API、奥が深い…
普段仕事でJSやCSSを書かないので新鮮だけど詰まるところが結構ありますね。
ドキュメントは充実してますが、英語だったりTypeScript版しかなかったりで読み込むのが大変です。
Googleが提供するサービスは変化が速いので参考書はすぐ陳腐化してしまうよなぁと思いつつ、知らない機能は使いようがないのでパラパラ眺めてみるとさらに最適な機能が使えるかもしれないですね。
関連
-

-
Google Map APIで地図にMarkerを描画する
趣味で撮る写真をどうにか整理したくて。 ただリンク張るだけだと面白くないので、Google Map APIで地図の上にMarkerとリンクを描画してみました。 ついでにWordPressの上でJSファ ...
続きを見る
-

-
ペグマンが行方不明になるので修正
Google Map APIを使って地図を作っていたんですが。 ペグマン表示されてないじゃん!! 幸い同じ現象について書いてる人がいたので無事解決。 ペグマン帰ってきました。 目次1 ペグマンとは2 ...
続きを見る
-

-
Google Map APIのデフォルトボタンを非表示にする
前回自分で作ったGoogole Mapからペグマンが行方不明になってた件。 表示自体は直ったけど、やっぱりストリートビューボタンいらないよね? ということで非表示にしちゃいました。 Google Ma ...
続きを見る


